

Showing posts with label 1930's. Show all posts
Showing posts with label 1930's. Show all posts
Wednesday, April 11, 2012
Saturday, February 25, 2012
The 1938 Dress: Tutorial Snap Button Closure
Here it is, the last post about the making of my 1938 dress, and what you see in the picture below is the side with the button closure:

Nice, right? Actually so much better than a zipper!
Normally, I would have opted for a zipper, for whatever reason. I guess I would have found it too much of a hassle to sew snap buttons and I am more familiar with sewing zippers. However, my decision to look up this technique also had to do with my mission of using up my stash/notions/whatever-clusters (I have TONS of snap buttons, but NEVER the right zipper at hand), as well as kneeling myself deeper into the real reason why I sew vintage - to LEARN stuff...
Friday, February 24, 2012
The 1938 Dress: Making the skirt
On we go, today, we are making and adding the skirt!

This is not a real tutorial post, but I wanted to show you how this pattern works. I find it quite interesting, as there is a bunch of gathering right in the center front of the skirt, which adds nice width, while keeping the silhouette narrow from front and back. I actually sewed a vintage pattern with this kind of skirt before, but I altered it back then, because I couldn't imagine that this bunching up right between my legs would work out... :-) This time, I went for it, and I like the result!


This is not a real tutorial post, but I wanted to show you how this pattern works. I find it quite interesting, as there is a bunch of gathering right in the center front of the skirt, which adds nice width, while keeping the silhouette narrow from front and back. I actually sewed a vintage pattern with this kind of skirt before, but I altered it back then, because I couldn't imagine that this bunching up right between my legs would work out... :-) This time, I went for it, and I like the result!

Thursday, February 23, 2012
The 1938 Dress: Finished! Vote and Win!

So this is the finished dress from my 1938 magazine:

Thursday, January 26, 2012
The 1938 Dress: Tutorial basting and setting in Sleeves
Here we go, today I'll show you how I first basted in, then set in the sleeves I so nicely prepared yesterday. I'll also explain the whole point of basting sleeves a bit later in the post:

Again, I am using the book from 1935 as a reference. It is a fairly small book, but there is so much information in it!
This illustration is our reference for the basting:


Again, I am using the book from 1935 as a reference. It is a fairly small book, but there is so much information in it!
This illustration is our reference for the basting:

Wednesday, January 25, 2012
The 1938 Dress: Tutorial Preparing Sleeves

It's funny, even though I am going at an extremely slow pace, reading up every stitch I make in my vintage sewing book and stopping to take pictures after each move, I feel like I am moving along nicely!
Gone are the days where I thought I could finish a dress in one evening, here are the slow-paced precision days! :-)
I'll first show you how I applied the velvet stripes, but you can just scroll down to get to the sleeves if that's what you stopped by for...
Monday, January 23, 2012
The 1938 Dress: Tutorial Built-up Neckline
Dear Readers: Happy 2012!

I want to apologize for my long absence, but really, it was for the better. And I don't only mean for the better of myself, but for you, too ;-)
The blogging got quite stressful, because I couldn't keep up with my own ideas and instead of enjoying my hobby, it became pressure. So I stepped back, thought about where I wanted to go with this blog - and came back.
Well, I will bring you even more information. I will not merely "show and tell" what I've sewn, but I will provide you with more details - things I am learning along the way, techniques I am picking up, patterns I'm creating. Maybe less posts in total, but the posts will be filled with information that hopefully inspire you and give you useful information.
I promise to try and make better pictures (it's difficult with the low-light winter season...), answer questions (as always!) and only write when I feel like it. I can't promise that my fingernails will always be perfectly manicured, but hey, my priorities lie elsewhere ;-)

The beginning of my 2012 blogging is this 1938 dress I have had on my list FOREVER. I was just going to sew it up and show you, but what's the point? As you might know, vintage instructions are usually minimal and say little more than: put it together. In this instance for example, it says to leave the left side open within the marks and prepare it for snap-button closure. But how exactly is a snap-button closure done? Well, here enters my 1935 sewing book!

It has a lovely signature from the previous owner that says 1958, but the copyright of the book is 1935, so a match made in heaven. And while I first only planned to give you the snap button tutorial, I decided we'll go top to bottom.
So let's get to it!
This dress features a gorgeous built-up neckline which is achieved with a slit and facing.

Monday, November 7, 2011
A Blazer for Mom

My mom has always been the biggest promoter, sponsor and motivator of my creative undertakings, no matter what field they happened to be in. So it is no surprise she also gave me a little push onto the next level in sewing: making a tailored garment for someone other than myself... She also insisted on being my first "real" customer, wanting to pay for it. At this point Mom, I apologize for how long you had to wait for this!
She expressed her wish for a blazer in Spring, and I only now got done with it... But then again, we live 800 kilometers apart from each other...
I knew this project was going to stretch my abilities a bit, a blazer is a difficult garment to begin with, and to fit it perfectly, there have to be several fittings... First, we decided on a general shape and pattern to base the blazer on. I didn't want to have to make the pattern from scratch, as that would have probably taken me an extra 5 years...
We took the 50's blazer that some of you already know from my 1950's Travel Set as a first guideline:

There were plenty of adjustments to be made. I made a muslin for a first fitting, which went surprisingly well and we actually only needed one additional fitting after that.
We changed the sleeves from 3/4 to full length and I added a sleeve vent to it - which was a first for me and I struggled a bit with making the pattern for it...

Wednesday, June 29, 2011
Me-Made-Mittwoch #13
Deutsch: Grau
Bei Me-Made-Mittwoch tragen die Teilnehmerinnen jeden Mittwoch ein selbst-geschneidertes Kleidungsstück (oder auch Accessoire). Die Idee und Organisation stammt von Catherine von Cat-und-Kascha, und Neueinsteigerinnen sind jederzeit willkommen! Einfach auf ihrem schönen Blog den Button abholen und Euren Link hinzufügen bei Mister Linky auf ihrer Seite.
Diese Woche seht ihr HIER, was die anderen Teilnehmerinnen heute Schönes tragen.
Was ich heute trage (noch etwas müde und ungeschminkt...):


Dieses Leinenkleid ist das wohl "erfolgreichste" Stück in meinem BurdaStyle studio. Ich habe es vor ca. einem Jahr nach einem Schnittmuster von 1935 geschneidert. Die Taschen habe ich dazu-gedichtet, den Ausschnitt etwas tiefer gesetzt, sonst blieb es ziemlich original.

Ich habe übrigens auch die gestreifte Jacke genäht, sowie das dritte Kleid von links mit Jacke, alles zu finden in meinem BurdaStyle studio. Sicherlich werde ich es auch in Kürze beim Me-Made-Mittwoch vorstellen, jetzt passt es wieder zur Jahreszeit. (Den Mantel ganz rechts habe ich auch genäht, in einer Winter-Version mit Änderungen, HIER).
Nun noch eine Vorankündigung: Ich habe dieses wunderbare Booklet erstanden - vermutlich aus den 1940'er Jahren! Nun lerne ich also, selber Schuhe herzustellen! Bereits habe ich mit geflochtenen Sohlen begonnen und werde vermutlich heute noch den ersten Post dazu schreiben.

English: Green
Bei Me-Made-Mittwoch tragen die Teilnehmerinnen jeden Mittwoch ein selbst-geschneidertes Kleidungsstück (oder auch Accessoire). Die Idee und Organisation stammt von Catherine von Cat-und-Kascha, und Neueinsteigerinnen sind jederzeit willkommen! Einfach auf ihrem schönen Blog den Button abholen und Euren Link hinzufügen bei Mister Linky auf ihrer Seite.
Diese Woche seht ihr HIER, was die anderen Teilnehmerinnen heute Schönes tragen.
"Mittwoch" is German for Wednesday, so the participants wear a self-made garment or accessory every Wednesday. Catherine from Cat-und-Kascha is organizing it and you are welcome to join us anytime! Just go over to her blog to grab the button and add your link at Mister Linky on her site!
HERE you see the outfits from this weeks participants.
Was ich heute trage (noch etwas müde und ungeschminkt...):
My outfit today (still a bit tired looking...):


Dieses Leinenkleid ist das wohl "erfolgreichste" Stück in meinem BurdaStyle studio. Ich habe es vor ca. einem Jahr nach einem Schnittmuster von 1935 geschneidert. Die Taschen habe ich dazu-gedichtet, den Ausschnitt etwas tiefer gesetzt, sonst blieb es ziemlich original.
I made this linen dress about a year ago from a pattern from 1935. It is probably the most "successful" garment in my BurdyStyle studio. I added the pockets and made the neckline a bit lower - other than that it is pretty much original.

Ich habe übrigens auch die gestreifte Jacke genäht, sowie das dritte Kleid von links mit Jacke, alles zu finden in meinem BurdaStyle studio. Sicherlich werde ich es auch in Kürze beim Me-Made-Mittwoch vorstellen, jetzt passt es wieder zur Jahreszeit. (Den Mantel ganz rechts habe ich auch genäht, in einer Winter-Version mit Änderungen, HIER).
I also made the striped jacket and the third dress from the left with jacket. You can find it all in my BurdaStyle studio. I will surely soon present it at Me-Made-Mittwoch, now that the season is right... (I also made the coat on the right, in a winter version with some alterations, HERE).
Nun noch eine Vorankündigung: Ich habe dieses wunderbare Booklet erstanden - vermutlich aus den 1940'er Jahren! Nun lerne ich also, selber Schuhe herzustellen! Bereits habe ich mit geflochtenen Sohlen begonnen und werde vermutlich heute noch den ersten Post dazu schreiben.
A little Preview: I got this wonderful booklet - problably from the 1940's - about how to make your own shoes! I have already started braiding/sewing my first set of soles and will write a first post very soon, probably later today.

Monday, May 16, 2011
My 1938 Coat: RTW Tailoring sew-a-long - FINALE!
May I introduce to you:

This is the coat I made for the RTW-Sew-along that Sherry from Pattern-Scissors-Cloth was posting. It was an AMAZING sewalong and I cannot give her enough credit for it. This is probably the most precisely constructed/sewn garment I have made so far. And that coming from a pattern from 1938 really means something. I have written two previous posts:
First: RTW-Sew-along THE MUSLIN - where I wrote about some fitting issues
And: RTW-Sew-along ALMOST THERE - where I wrote about the things that I learned and all I had left to choose were buttons.
From the original illustration it seemed like they were using Chinese Frog buttons:
First of all, thanks to everybody for your input here and on the Flickr group! I really appreciated it and it helped me decide! I first toyed with the idea of making my own. I found some instructions, especially for the button part, but I worried about it a lot. I find buttons can easily make or break a garment, and as I was already liking my coat a lot at that point, I didn't want to risk anything by putting on scraggly little hand-made crooked frogy things. (If this is all you see from this post now, click on the "read more" sign below. It's small and I like to point it out...)

This is the coat I made for the RTW-Sew-along that Sherry from Pattern-Scissors-Cloth was posting. It was an AMAZING sewalong and I cannot give her enough credit for it. This is probably the most precisely constructed/sewn garment I have made so far. And that coming from a pattern from 1938 really means something. I have written two previous posts:
First: RTW-Sew-along THE MUSLIN - where I wrote about some fitting issues
And: RTW-Sew-along ALMOST THERE - where I wrote about the things that I learned and all I had left to choose were buttons.
From the original illustration it seemed like they were using Chinese Frog buttons:
| |
| Source: Deutsche Moden-Zeitung, Heft 25, 1938 |
First of all, thanks to everybody for your input here and on the Flickr group! I really appreciated it and it helped me decide! I first toyed with the idea of making my own. I found some instructions, especially for the button part, but I worried about it a lot. I find buttons can easily make or break a garment, and as I was already liking my coat a lot at that point, I didn't want to risk anything by putting on scraggly little hand-made crooked frogy things. (If this is all you see from this post now, click on the "read more" sign below. It's small and I like to point it out...)
Wednesday, May 11, 2011
Me-Made-Mittwoch #8!
Today with only a few words, because I'm in a morning-hurry...
A jacket from a 30's-pattern, more information about it here, and a me-made necklace.


Also, Cat asked us to show our fabric stashes. Until recently, this wouldn't have been possible for me - a big box was under the bed, one in the hallway, some in my guestroom etc. Now it is all in clear plastic boxes to the left and right of my guest bed:


In the hanging Ikea thingy I have some fabric rolled up that is already set for projects, along with notions in the drawers. It still all needs more organizing, but I am getting there.
Have a lovely Wednesday! Here are the other participants outfits.
A jacket from a 30's-pattern, more information about it here, and a me-made necklace.


Also, Cat asked us to show our fabric stashes. Until recently, this wouldn't have been possible for me - a big box was under the bed, one in the hallway, some in my guestroom etc. Now it is all in clear plastic boxes to the left and right of my guest bed:


Have a lovely Wednesday! Here are the other participants outfits.
Tuesday, May 3, 2011
RTW Tailoring sew-a-long - Almost there!
Readers, I am thrilled! The RTW-Sewalong from Sherry over at Pattern-Scissors-Cloth has been absolutely fabulous! We are almost done with our coat - some people even went ahead and finished! - and I want to show you some details before the final post. I will tell you some of the most important things I have learned...
As you see in the first picture, when sewing the muslin I didn't even bother about easing in the sleeve correctly, as the fabric had zero flexibility. I was wondering though how on earth I would be able to ease in that much fabric and was quite worried about it...
 Sherry writes such smart little things like "let the feed dogs do the work". Wow, I never knew about my feed dogs abilities! I admit that I am guilty of having stretched and yanked at my shorter piece of fabric like crazy in the past... woops! I will never do that again! It even once happened that I eased too much, because the feed dogs were so hungry! :-)
Now would you look at this fabulously gathered and eased in sleeve...

 In the picture above, I left the collar up, so you can also see another great thing - how the upper collar is "rolling over" the seam... you know, I DID know about cloth allowance before, but we actually made two separate paper patterns, while in the past, I would just sort of cut the upper collar a bit wider...
If any of this is interesting to you, go check out the sewalong. It is full of really great, professional sewing knowledge.
Making the paper pattern really took a long time and put my patience on a test. But it was so worth it! Especially when working off a vintage pattern, which can be a lot of guess work as it is...
We made an extra paper pattern for all the lining pieces, too. We determined how long the hem will be and calculated it all out beforehand. But don't be scared, she explains so well!
 This is a bit of my inside, shoulder pad and sleeve wadding, as well as facing...


Here is the collar and lapels... A bit of magic after all the planning: the roll line really just fell into place automatically, just as Sherry promised it would. Cool. I think it is pretty grand, though I do have to give it another session at the iron. I have what another sew-alonger calls a dimple at the gorge line...
So now it comes down to buttons. In the original illustration they seem to have cord buttons - I believe they are called Chinese Buttons in English (German: Posamenten-Verschluss)? I am looking for instructions and decide on how to make them, if anyone has suggestions, they are highly, highly welcome! Has anyone of you ever made them yourselves?

I will surely make another jacket and go back to those posts - my coat was relatively easy, as it has no pockets, and no sleeve vents. I have lost all fear of coats and jackets now and will move on to even bigger things, ha!
Hopefully I will be back with the final post very soon.
As you see in the first picture, when sewing the muslin I didn't even bother about easing in the sleeve correctly, as the fabric had zero flexibility. I was wondering though how on earth I would be able to ease in that much fabric and was quite worried about it...

Now would you look at this fabulously gathered and eased in sleeve...


If any of this is interesting to you, go check out the sewalong. It is full of really great, professional sewing knowledge.
Making the paper pattern really took a long time and put my patience on a test. But it was so worth it! Especially when working off a vintage pattern, which can be a lot of guess work as it is...
We made an extra paper pattern for all the lining pieces, too. We determined how long the hem will be and calculated it all out beforehand. But don't be scared, she explains so well!


Here is the collar and lapels... A bit of magic after all the planning: the roll line really just fell into place automatically, just as Sherry promised it would. Cool. I think it is pretty grand, though I do have to give it another session at the iron. I have what another sew-alonger calls a dimple at the gorge line...
So now it comes down to buttons. In the original illustration they seem to have cord buttons - I believe they are called Chinese Buttons in English (German: Posamenten-Verschluss)? I am looking for instructions and decide on how to make them, if anyone has suggestions, they are highly, highly welcome! Has anyone of you ever made them yourselves?

I will surely make another jacket and go back to those posts - my coat was relatively easy, as it has no pockets, and no sleeve vents. I have lost all fear of coats and jackets now and will move on to even bigger things, ha!
Hopefully I will be back with the final post very soon.
Wednesday, April 20, 2011
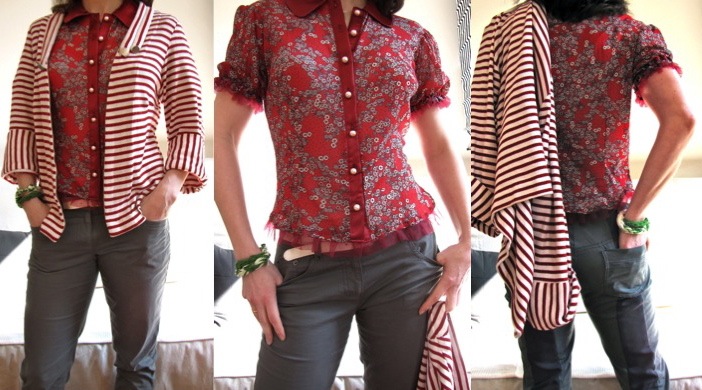
Me-Made-Mittwoch #5!
Wednesday (Mittwoch) again! Try my new Tool in the column on the right: The Google-Translator!
Liebe deutschsprachige Besucher - in der rechten Spalte gibt es jetzt den Google-Übersetzer - er wird Euch zwar wohl kaum helfen, das Englisch besser zu verstehen, aber bestimmt zaubert er Euch ein Lächeln auf die Mittwochs-Backen!
Did it help you understand? I bet not. Did it help you smile? I bet!

I recently took stock of all the things I have made so far, and I was surprised how much it is. So I decided to make my Me-Made-Mittwoch outfits as me-made as possible. Here you see three pieces combined - or maybe I should say two and a half...
The blouse I made a long time ago, it's surprising that I can still wear it, as it was my very first go at a real blouse with collar, collarstand and a button closure. It's the Burda pattern 7831, and it was one of my first things posted in my BurdaStyle studio.
The jacket is from a pattern from 1935, from the same magazine I took the pattern for this white coat I recently finished and blogged about. It was originally meant to go with my linen dress, posted here in the BurdaStyle studio...
The pants are not entirely me-made. They were skinny pants and I don't do skinny pants. I mean, they were labeled a 34 I believe (which is usually a size too small for me anyway), but man, they were beyond skinny. So as you see, I was very bold, removed the back pockets, cut both legs open in one straight line , set in a strip of darker fabric and put the pockets back on. Now I can wear them. I swear I look skinnier in them now than I did before, pressed into them like a sausage....
Find out what the other amazing participants are wearing today HERE. Oh, and you'd be welcome to join in the fun any time. Thanks to cat-und-kascha for organizing this!
Have a lovely Wednesday, everybody!
Wednesday, April 6, 2011
New Coat, Old Pattern - from 1935!
It would have been much easier to come up with a 10 piece winter travel set if it didn't include outer wear. The set from 1953, which inspired me to do my winter 2011 version, included outer wear, so I couldn't cheat out of it either. The coat had an almost impossible list of requirements to meet:

Click that tiny little "read more" button right underneath, if that's what you want to do...
- Well, logically, it has to work with absolutely all the other pieces
- I have to be able to wear my cold, cold weather faux fur vest or knit jacket underneath without the armholes tearing
- It had to be elegant enough for me to take it to the opera without leaving it self-conscious next to all the fur coats while waiting for me to come out
- While at the same time being sporty enough for a snowball fight

Click that tiny little "read more" button right underneath, if that's what you want to do...
Subscribe to:
Posts (Atom)