This is a dress I recently finished. My mother-in-law gave me this beautiful brown lace almost a year ago and I finally decided on a pattern! I used the tiered wedding dress pattern Nr. 112 from Burda Style 3/2013 (available for download!), changing the skirt part by making only the top layer instead of going floor length and tripple layer...
The blue fabric is more vibrant in real life than in the picture above. Construction was surprisingly simple! The underlying bodice is made first, I only had minor fit alterations to make, which is very simple now that I finally own a dressform with my measurments...
Showing posts with label necklines. Show all posts
Showing posts with label necklines. Show all posts
Sunday, June 2, 2013
Delicious Lace!
Labels:
burda,
BurdaStyle,
dress,
finished projects,
lace,
necklines,
sewing
Sunday, February 3, 2013
Sweater Refashion Extravaganza #2
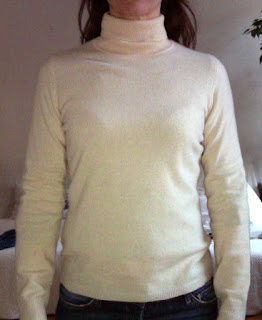
So here comes my second sweater re-fashion project. A great example how less is sometimes more. In this case, it really didn't take much to turn this sweater from a boring never-worn item to a favorite cold-day darling. It is 100% cashmere, which is why I really wanted to turn it into something I wear...
Turtlenecks just never look good on me to begin with. The distance from neck to bust-point is shorter on me than in standard sizes, which is why this sweater also wrinkles in that area. On top of that, I had nasty little glue spots in the lower center front. These facts pretty much sent me on my way, and out came this: A two-color v-neck sweater with extralong sleeves (which, I swear, was entirely intentional!):
Turtlenecks just never look good on me to begin with. The distance from neck to bust-point is shorter on me than in standard sizes, which is why this sweater also wrinkles in that area. On top of that, I had nasty little glue spots in the lower center front. These facts pretty much sent me on my way, and out came this: A two-color v-neck sweater with extralong sleeves (which, I swear, was entirely intentional!):
Monday, January 23, 2012
The 1938 Dress: Tutorial Built-up Neckline
Dear Readers: Happy 2012!
I want to apologize for my long absence, but really, it was for the better. And I don't only mean for the better of myself, but for you, too ;-)
The blogging got quite stressful, because I couldn't keep up with my own ideas and instead of enjoying my hobby, it became pressure. So I stepped back, thought about where I wanted to go with this blog - and came back.
Well, I will bring you even more information. I will not merely "show and tell" what I've sewn, but I will provide you with more details - things I am learning along the way, techniques I am picking up, patterns I'm creating. Maybe less posts in total, but the posts will be filled with information that hopefully inspire you and give you useful information.
I promise to try and make better pictures (it's difficult with the low-light winter season...), answer questions (as always!) and only write when I feel like it. I can't promise that my fingernails will always be perfectly manicured, but hey, my priorities lie elsewhere ;-)
The beginning of my 2012 blogging is this 1938 dress I have had on my list FOREVER. I was just going to sew it up and show you, but what's the point? As you might know, vintage instructions are usually minimal and say little more than: put it together. In this instance for example, it says to leave the left side open within the marks and prepare it for snap-button closure. But how exactly is a snap-button closure done? Well, here enters my 1935 sewing book!
It has a lovely signature from the previous owner that says 1958, but the copyright of the book is 1935, so a match made in heaven. And while I first only planned to give you the snap button tutorial, I decided we'll go top to bottom.
So let's get to it!
This dress features a gorgeous built-up neckline which is achieved with a slit and facing.
Labels:
1930's,
1938,
built-up neckline,
dress,
how-to,
necklines,
sewing,
the 1938 dress,
tutorial,
vintage
Subscribe to:
Posts (Atom)


