
This is about the coat I made for the BurdaStyle Sewing Handbook, my name there, by the way, is ajtak7171.

THIS FIRST POST gives you an overview, initial sketches and an outline of how many days it took me and what I did on each day.
THIS SECOND POST gives you the detailed description of the changes I made from the original pattern, and details of days 1-4, with close-up photos of the sewing process and whatever bits of insight I can give.
THIS THIRD POST continues with the sewing of the coat from days 5-8, everything up to the lining, again including lots of pictures of course.
AND HERE FOLLOW DAYS 9 - 12:
Half days = 2-4 hrs. of work
3/4 days = up to 6 hrs.
whole days = 8 - 10 hrs.
I always started
the day with cutting out the pattern pieces that I would need for the next
step. Which meant about an hour of cutting in the beginning of each day...
(click to read on!)
Day 9 (half day): Making the lining bodice
So I thought it was going to be a treat working with the
lining – heat-wise it was, but I had forgotten that I actually dislike working
with lining material... This is a quality lining (as the lady in the store
said), so it’s not half as bad, still, the slipperiness and fraying is not
something I love. I was very careful when cutting it out, lining up and pinning
grain-lines and such, and it worked out well. Nothing much to report otherwise,
just sewing together the pieces. Would have loved to attach it right away and finally
cover up the fuzzy inside of the coat, but it was still a long ways to go until then. At least a good result was already announcing itself :-) Not much to show for, as making the lining bodice involved a lot of brain work...
Day 10 (whole day): Bottom part of lining and white band
embellishment
The bottom part of the lining was a long thinking process as well... I wasn’t
sure what shape to make it – whether to make it as wide as the shell fabric,
or narrower. I decided for the latter, making it just as wide as my „Balloon bands“.
I put fusible interfacing on the whole bottom part, as it will be playing a
„big supporting role“ for the hem. I calculated the lining length so that it would hold up the balloon hem
nicely, as opposed to hanging loosely, as a "normal" coat lining would.
After sewing all the lining together it looked so nice I almost wanted to keep it as a light coat or robe just
as it was ;-).


Here you see the hems hanging loose, I ironed under the lining hem and you
can see that it is meeting with the edge of the balloon band:

 |
| Before the lining and shell fabric hems were sewn together... |
Then on to the white band embellishment. I was very curious how labor intense it would
be, as I usually underestimate these things greatly...
I was at it for about 4 hours and got half way done. Not bad!
 |
| Going section by section I first pinned, then stitched the embellishment |
Day 11: (half day): Finish embellishment, sew in lining
Another 4 hours of hand-stitching the white band embellishment, thank
goodness it wasn't as hot anymore - holding the coat on my lap would have been
unbearable. It would have been much easier to put the embellishment on before
the zipper and facing. Live and learn.
Then finally I attached the lining to facing.

Finally the fuzzy inside is covered up. This is what the coat looks like inside-out:

It's turning out really heavy, so I sewed a heavy-duty coat-hanger to the neck...

Day 12: (half day): Finishing!!! Belt, beltloops, handsew
lining
What a feeling to wake up and know that I was going to finish this huge project! All that was left to do were the few places of hand-stitching to attach the lining and making the belt and belt loops (technically, you would attach belt loops before the lining, but I had to hand-sew them anyway, since it was too thick for my machine).
I used black for the outside and the lining fabric for the inside of the belt, enhancing both with fusible lining.


I had this great buckle from a belt I found at the second hand shop. You make a button hole to attach the buckle to the fabric part...

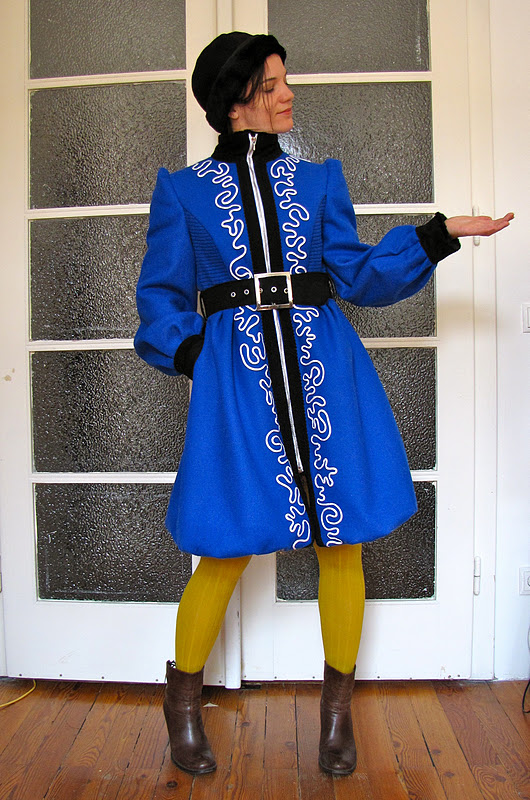
Here are pictures without belt:


...and with belt:


I am really happy with the way it turned out. Especially with the fact that it actually looks like the initial sketch. Except well, for the color, but that was burdastyle's decision, and I've come to like the color a lot. It was hard to send away after all the hard work but I have by now gotten it back. I also finally got the book and I have to say that it is really wonderful. I also admit that I was just a tiny little bit disappointed - all you see of my hard work is a small little picture of my coat, thrown on the floor, basically ;-) Also the color looks really dark and you basically look right over it, while in real life, well, it's a show stopper! Please don't misunderstand me - I love the book and I am saying all of the above with a smile, but oh well, I would have LOVED to see a garment of mine worn by a model!
Just the more reason to have given you in-depth information and pictures from this project...


This was the story of my diva coat. I hope you liked it.
Next I'll continue with my tutorial on the 1938 dress and I will also show you what projects I've come up with to use up my ever-growing fabric stash...
Best,
Katja

OMG! So lovely coat. It has some East European spirit for me :)
ReplyDeleteI am following you. I like your tutorials, you are so inspiring.