
Doesn't that always feel fabulous? All that new space for new clothes! But then again, being a re-fashionista, the pile in my sewing-room grew bigger and bigger proportionally... even more so since my husband went ahead and cleaned out his side, too...
What was I to do? Well, nine shirts later I got to this:

I used up nine shirts, most of them from my husband, only two from myself - one is missing in the picture below:

Some were short-sleeves, some long, some had stains, others were just out of style, others worn-out in some places. I tried to keep as many elements from the shirts as possible, like the collar, hems, buttons... But see for yourself, I'll give you a little how-to:
I decided which shirt I wanted to be the main-piece for the bodice - it had to be one that was in good shape, especially the collar and the buttons, not the sleeves.
I made some pleats under the bust, to get to a more fitted, feminine shape, using my dress form:

I cut off as little as possible in the beginning, just to be on the sure side. Then I went ahead and marked some style-lines with tape, and hand-basted it to the fabric, tried it on, then finally cut it off...

I did the same in the back, then attached the side pieces out of a different blouse to the back. from there, I pinned it in place at the front:

...I still left all the extra fabric attached, as you can see... only when I was really sure of where the seams would be, I finally went ahead an cut it off.

For the skirt panels I used another dress as a reference and cut them out of yet another three shirts, always keeping the button/buttonholes attached!

I went back to the dress form to position the panels. First I thought I would keep the buttons in the back, as you see below, but decided against it later. The only problem with the waist line is that the dress form has a higher waist than me. Which is why it looks a bit off...

... I did however keep the button and buttonholes on the front panels, and instead of sewing them together, I only buttoned them closed. Seems like store-bought shirts always have the same distance between buttons, I was able to button different shirts together as I wished! I also positioned the shirt parts with pockets so they would be placed where I could actually use them:

This is what the skirt looked like at this point. I first thought I could keep the hem uneven and curvy like the pieces were automatically, but I realized it was too uneven and too short altogether:

So I decided to add on in length and use the curvy original hems of the shirts that way:

Of course I had to keep the slits open. I used some bias-tape on the inside of that seam, just in case the wind catches the skirt and you catch a glance of the inside...

... what was left to do now was the facing on the arm holes, which I also finished with bias-tape on the inside:

That was basically it!

I had a cute idea for the belt: I used the button-closure of one blouse, just sewing the two pieces together:
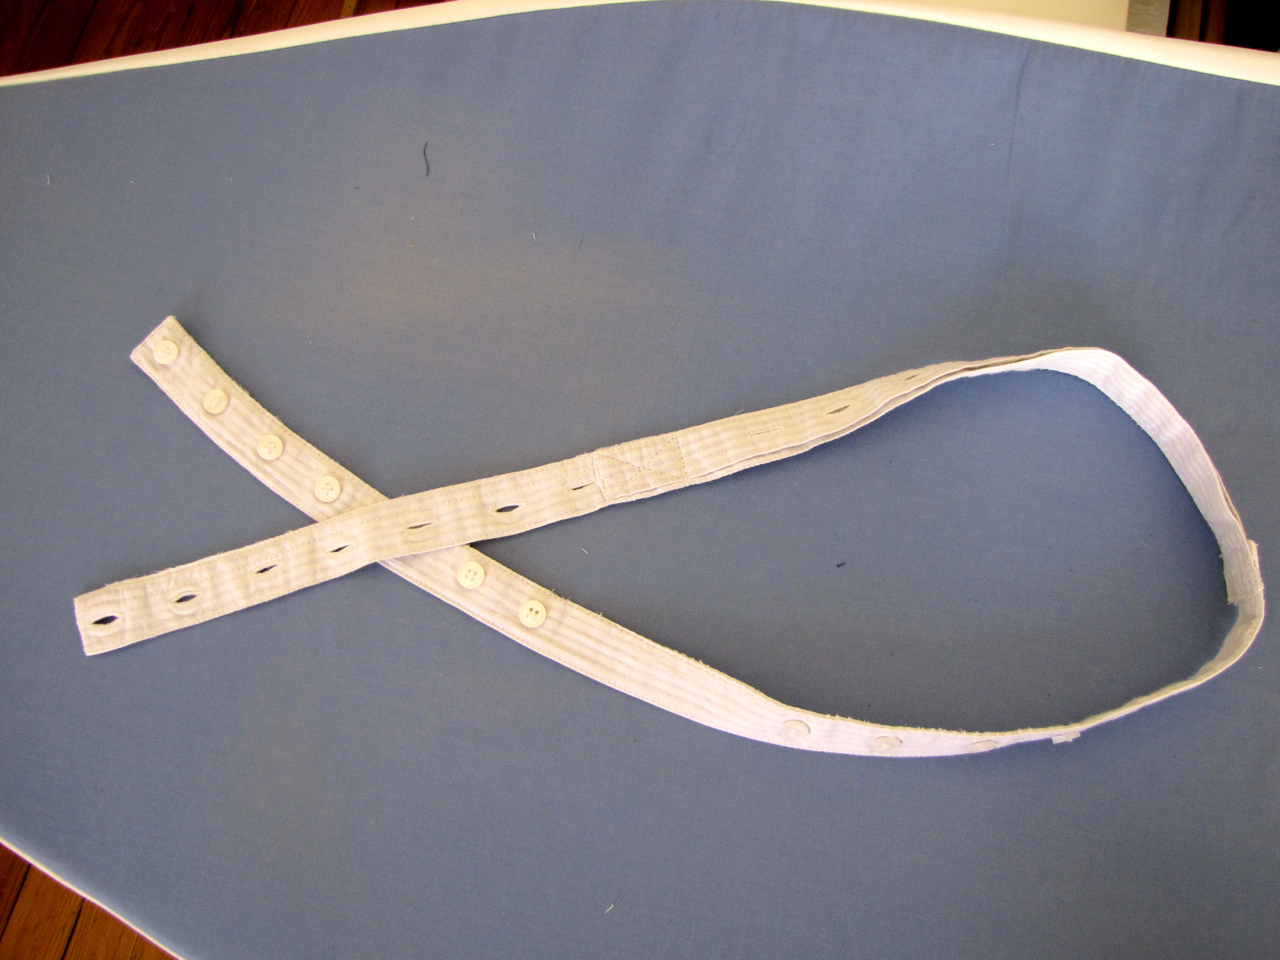
Kind of cute, right? I used the white blouse, one of mine, which had the buttons really close together - perfect for a belt! I sewed it to the back of the dress, to cover up the waist seam, which I wasn't entirely happy with:

Done!

Pockets, buttons, all intact and useful!

I can button the collar up and unbutton the skirt sides if I feel like it :-)

Perfect dress for a Sunday pick-nick right?


When I come back, I will start my next vintage sewing project. I got lucky at an auction and bought another really old sewing book, which I will use as a reference to make this amazing ensemble (the white dress with jacket):

Best to all of you,
Katja
That dress is amazing! YOU are amazing!! I am in awe. What a great idea! It kinda makes me wish I was married, just to have a supply of shirts...
ReplyDeleteThat's really cool! Thanks for all the detail on how you made it :)
ReplyDeleteLove the detailing in the bodice. Very cute
ReplyDeleteFabulous idea!!!
ReplyDeleteWow, you made a fabulous dress. That is awesome!
ReplyDeletelove it.....
ReplyDeleteThat is absolutely fantastic!
ReplyDeleteGorgeous and unique, one of a kind dress. It looks super comfy and functional too!
ReplyDeleteI absolutely adore this! Nice job!
ReplyDeleteБог мой! Как красиво и стильно! Спасибо большое за мастер-класс
ReplyDeleteThat's amazing!!
ReplyDeleteWonderful job!
ReplyDeletebrilliant use of the shirts!! It looks smashing on you too
ReplyDeleteVraiment une bonne idée ! Cette robe est très réussie ! Bravo !
ReplyDeleteSweet!
ReplyDeleteWonderful!
ReplyDeleteLiebe Grüße aus dem kalten Deutschland
Valomea
Cooooool!
ReplyDeleteI Can´t believe you also made a tutorial while you were planing and sewing that dress. Incredible!
lots of love, Birgit
Cooool!
ReplyDeleteI can´t believe, that you also made a tutorial, while you were planing and sewing that dress.
lots of love, Birgit
wow wie cool ist das denn! das ist wirklich die beste und originellste art alte shirts wiederzuvenden! ich habe deinen blog über den blog reverse clothing gefunden und war sofort begeistert! so einer superkreativen österreicherin muss ich natürlich sofort folgen;)
ReplyDeletelove and kiss,mary
http://maryloucinnamon.blogspot.com
I so love this project! What a great idea. I really enjoy your blog which is why I wanted to give you the Liebster blog award. There are directions on my blog for how to pass it on to other great blogs. It was given to me yesterday so I thought I would keep the tradition going with your blog as it's one of my favorites.
ReplyDeleteThat dress is totally amazing! Very cool use of refashioning!
ReplyDeleteVraiment très réussie cette robe. Jolie forme, bon choix d'imprimés et de couleurs . Les explications sont claires, le mannequin superbe! merci
ReplyDeletewow, einfach genial was du aus den hemden gezaubert hast!!
ReplyDeleteSalut, j'aime bien ton blog parce que tu expliques toutes les étapes, moi j'aime beaucoup la customisation, la couture et la recup', bravo pour ton travail
ReplyDeletecoudsmoidressing.blogspot
Wow. I was impressed by the 1940's vintage blouse you made but this is stunning. You are superb at the sewing machine but you also have a rare ability to take a concept from idea to reality. Impressed...and just a bit jealous. But absolutely love your ideas, your style and your willingness to share!
ReplyDeleteThank you so much for this great compliment. Maybe it makes you feel better if I tell you that not everything I make turns out this great? I just finished something that isn't so great, and I consider sharing it anyway, just to be fair :-)
ReplyDeleteSuch a romantic idea! I kept the shirts of my father in the basement for nearly 10 years now, as if I´d known to use them like this one day! Thank you for sharing this beautiful idea!
ReplyDeleteVeeery pretty and inspirational!
ReplyDeleteI love love love this dress! I wanted to pin it, and it got blocked as "suspicious" so I sent them a link and and filled out the form for when someone thinks they have made a mistake. I can't imagine what could be offensive, spammy or suspicious about your wonderful website! Anyway, you might want to look into it too. Pinterest is the way I found your website, so you don't want them blocking you. The only think I could think of is someone getting prudish about your banner, which I think is extremely tasteful and creative. You know how we have an over abundance of uber prudish fundamentalists in the U.S. Some people get offended by a bare shoulder, sigh.. This dress is so cool it's AMAZIING
ReplyDelete