...into a funky, even casually sexy item - with pockets!
The piece I started with was actually cool in it's general idea, I love simple cuts, but the bodice was too short on me and frankly, the buttons down the back might look cool when you're up and about, but they are quite uncomfortable when you sit on a chair, resting your back...
So I cut it open along the side seams and sleeves, and look:
Simple, right. And even simpler the re-fashion idea: slide it around by 90 degrees and you get this:
The front and back bodice become the sleeves, the sleeves the bodice. Of course, they were not quite wide enough, so some re-fashion magic needed to happen...
First I cut the pocket/style-lines into the front bodice. It took courage and concentration, but they ended up the way I wanted them. Then I copied that shape onto a piece of paper:
Below you see the already cut-out pattern piece for the front inlay - the left part of the paper, to which I added the shape of the back on its other side...
...I cut it out of the remaining sleeves from the red hubby sweater...
I used some of the red rib-knit to finish the top of the pockets:
...and used the brown rib-knit sleeve cuffs to add width to the bottom of the bodice:
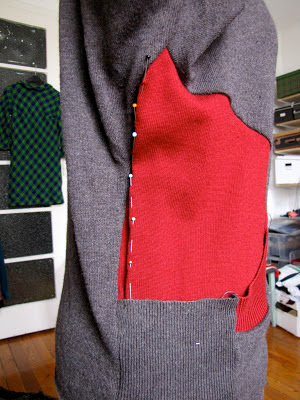
Then I attached the red "inlay" piece to the cut-out shape of the bodice - the seam goes exactly to the red rib-knit piece. From there, it just hangs all the way down to the hem, to create the pocket:
On the wrong side, I sewed down the loose-hanging inlay to close the pockets...
After closing the sleeves, the result was already pretty good, but ended up having a bit too much width, so I corrected the inlay shape a bit, going down straighter than before:
It is always worth taking that extra step, no matter how much you feel like just moving on. But it makes all the difference in the end, from being ok, to being exactly the way you wanted it...
Now I only added the red hem, making sure not to make it tight, but the same width as the rest of the sweater, because that is the look I was going for...
Again, this sweater was a good quality sweater, and it finally gets its deserved time outside of the closet...:-)
With its pockets and loose fit, it's definitely a casual item, great with jeans.
But you can get a bit of sexyness out of it, if you open one or two more buttons at the neckline and let it fall over your shoulder...
Yes, this was a bit more time-consuming and tricky than my last refashion, but I have the absolutely simplest refashion yet coming up next, so bear with me!
Take care you re-fashionistas out there!
Best,
Katja


This is wonderful, great job!
ReplyDeleteI agree this is fabulous! It looks great on and with the red pop of colour!
ReplyDeleteMe encanta el resultado es una preciosidad de re-cycling
ReplyDeleteGratuliere Dir; sehr gelungen
ReplyDeleteLove, love, love this! I love slouchy necklines, and this is just amazing! How I wish I had a sweater like the one you had in the beginning. :)
ReplyDeleteThis is the most original refashion I´ve seen in some time. Very creative and the result is awesome + you look great in it!
ReplyDeleteThis is your best re-fashion ever.
ReplyDeleteRichtig richtig klasse.
ReplyDeleteWow - this is a fab refashion, so clever!
ReplyDeleteGreat refashion! The red is great contrast and turning the sweater 90° is a great idea. Thanks for sharing how you did it! This is great inspiration because I do have some sweaters that I've been collecting to work with.
ReplyDeleteI love refashion and I really love your sweater refashion!
ReplyDelete