Showing posts with label blouse. Show all posts

Wednesday, August 28, 2013

Me-made from Head to Toe!

English: Grey Textblocks
Deutsch: Grüner Text


It's been a while since I last participated in a Me-Made-Mittwoch (Mittwoch is German for Wednesday), but I think this outfit is worthy for a return.

Es ist schon eine Weile her, dass ich bei einem Me-Made-Mittwoch mitgemacht habe, aber ich glaube dieses Outfit ist für eine Rückkehr würdig.


Hat, Blouse, Pants and yes, Shoes are all made by me.

Ich habe Hut, Bluse, Hosen und ja, auch die Schuhe selber gemacht.

Tuesday, July 2, 2013

Linen Remake - with tutorial / how-to!

Summer is here! As much as I'm starting to get into sewing quick t-shirts from jersey (tutorial coming up!), the best thing to wear on a hot day is loose linen or silk tops. This shirt was handed down to me from my generous husband (who dislikes the fast wrinkling...). It was in good shape, just -well- a man's cut and size...


I know pin-tucks are usually placed closer to the center, but I didn't want to take off the collar and I needed to get rid of some excess width on the shoulders anyway, so I placed them further out than normal. I think it adds a lovely twist with them going over the shoulder and all the way down the back...


It was a quick project and gave me the chance to finally start using some of those pressure feet I never use, as well as some specialty stitches from my machine.

Sunday, June 10, 2012

Original Vintage Refashion!

Yes, I promised a new free pattern, and I am almost ready with it. But first I had to fit in my monthly contribution to the refashion co-op! After last months huge success with the 9 shirts off his back, I wasn't sure whether I was going to be able to live up to the expectations for my next project... :-) But how about this - an original 1943 Refashion project?


I own a few German pattern magazines from the 40's and they feature a one-page refashioning section! They certainly had to use all the resources they could get their hands on. In this example, they suggest using an old long-sleeve blouse on which the collar, buttons, underarms and cuffs are torn up and turn it into this cute short-sleeve version, for which you can cut away all the problematic areas...

Thursday, February 23, 2012

The 1938 Dress: Finished! Vote and Win!

If you are here to vote and win, just scroll down to the second half of the post! :-))


So this is the finished dress from my 1938 magazine:


Friday, June 24, 2011

My 10 Piece Travel Set: 9 down, 1 to go!

Wow, I am actually getting closer! These are my pieces number 8 and 9 for my ten piece fall/winter/spring travel set! I have already presented them on my dress form in the last post, but here they come, modeled by me:

I have already presented the skirt, too, with a full how-to/tutorial HERE, in case you are interested. It features half-circle pockets and a visible zip in the back:


But my biggest pride at the moment is this shirt:


Wednesday, June 22, 2011

Me-Made-Mittwoch #12, hot off the sewing machine!

English speaking visitors welcome! Please scroll to the green textblocks!

Das ist meine Mittwochs Kleidung heute:
This is my outfit today:


Vielleicht langweilt Euch der rote Rock schon - ich habe ihn letzten Mittwoch schon gezeigt (aber  nicht getragen) und Euch auf das Tutorial dafür aufmerksam gemacht. Aber um den Rock geht es ja auch gar nicht, sondern um dieses Shirt:

You might be tired of this skirt already, as you might have seen it last Wednesday and in my tutorial already, but it's all about this shirt:


Ich habe es gerade eben fertig genäht und bin super glücklich damit. Ich nenne es das "süss wie seine Knöpfe-Shirt" (klingt VIEL besser auf Englisch). Es vereint viele meiner Lieblings-Details: Vintage Knöpfe, einen Peter Pan-Kragen, diese kleinen Ärmel, die auf Englisch Cap-Sleeves heissen und deren deutscher Name mir nicht einfällt (ich zähle auf Euch!), und Biesen. Ich habe es selber entworfen und das Schnittmuster hergestellt (*stolz*) und bin sogar mit meiner Ausführung zufrieden. Danke Euch allen für die ermutigenden Worte letzte Woche, die Overlock betreffend. Ich habe ein Buch bestellt und glaube bereits Fortschritte gemacht zu haben, obwohl ich bis jetzt erst das Inhaltsverzeichnis las :-). Hier noch eine Nahaufnahme:

I just finished it minutes before posting it here and I am actually really excited about it. I call it the "cute as its buttons shirt" (vintage buttons) and it features many of the little things I love: pleats, cap sleeves and a peter pan collar. 
I drafted it myself (*proud*), and I am even happy about my execution. Thank you all for your kind words about serging last week! I ordered a book about it and feel like I have made progress already, even though I have only read the table of contents so far :-). Here is a close up:


Natürlich werde ich Euch auch noch zeigen, wie es getragen aussieht. Dieses Top verdient einen separaten Post, denn es gehört auch zu meinem berühmt-berüchtigten 10-teiligen Herbst/Winter/Frühling Reiseset. Dort präsentiere ich es dann auch mit den Hosen, Shorts etc. Hoffentlich komme ich morgen schon dazu.

I will show you how it looks on me when I write the actual post about it. It deserves an extra post because it is also part of my 10 piece fall/winter/spring travel set. I should get around to it tomorrow, hopefully.

Schönen Mittwoch euch allen - wer auch mitmachen will, hier geht's zu Cat-und-Kascha.
Und HIER findet ihr die anderen Mittwochs-Kleider!

Happy Wednesday everyone - if you want to join the fun and wear me-made-outfits (uhm- I guess that would be you-made outfits then...) every Wednesday, go to Cat-und-Kascha. And check out the other great outfits today HERE!

Wednesday, May 25, 2011

Me-Made-Mittwoch #10!

Here is one of my "Classics". The blouse and skirt are both from a travel set from 1953. You can read a little more about it HERE on this blog, or a little more about it in my BurdaStyle studio HERE. They are both made of fancy silk fabrics and a treat to wear. The pattern for the sunhat comes from the June 2009 issue of ANNA. As much as I have fallen in love with hats, I'm not sure I will wear it today. I like the shape, but not the fabric I used. It is too "country-side" for the city :-) I think I will make it again in about a dozen solid colors though.
I took the picture yesterday evening, and yes, of course I ironed the skirt today before putting it on...


Cat-and-Kascha came up with this idea, and you can join us anytime!
And if you want to see the other me-made-Mittwoch outfits (Mittwoch = Wednesday), click HERE.
Have a lovely Wednesday everyone! I will be terribly busy again, but I am looking forward to visiting your blogposts this evening!

Sunday, May 15, 2011

Free Blouse Pattern and How-To!

Alright, here is my first pattern/how-to/tutorial! This blouse is part of my 10 piece winter travel set and I came up with the pattern myself. Here I will show you how! It is super simple and you can adjust it to your own measurements.


There are two ways you can use this pattern. Either use my measurements - I wear a European size 36, a Small usually. But I will also tell you how I came up with the numbers, and by taking your own measurements you can easily customize this pattern to your very own liking and shape. It is a super simple pattern and as it is meant to fit loosely. You will have an elastic in your waist, and an adjustable band for the top, so the measurements don't need to be super exact.

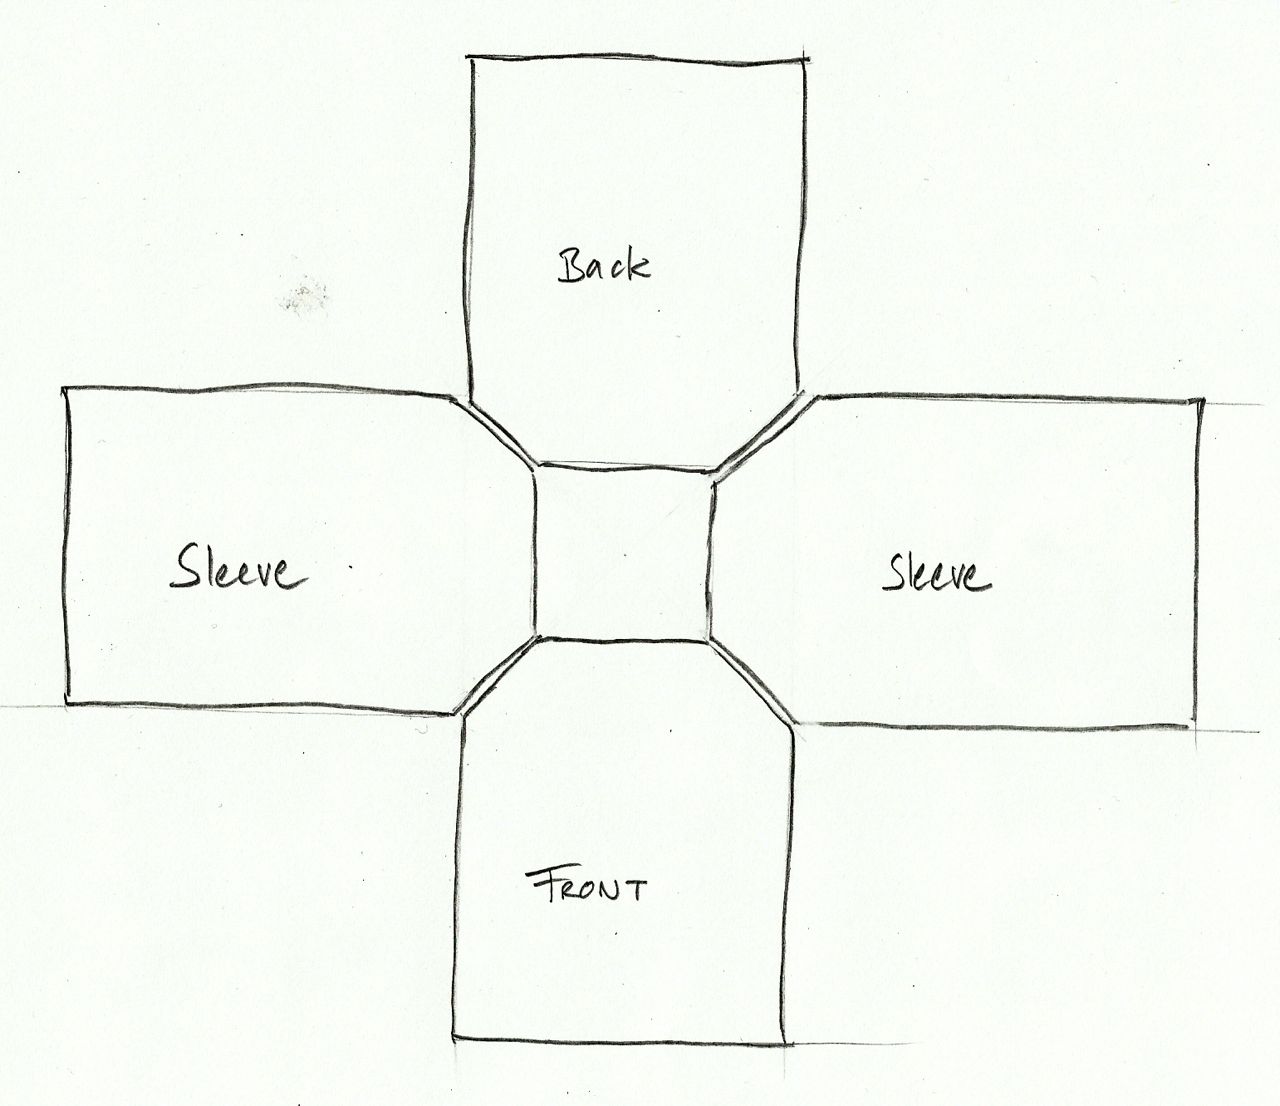
For a first overview, this is roughly what the pattern pieces will look like:

Kind of cool, right? Definitely not intimidating!

These are the measurements you will need:

If you want to compare yours to mine to see if my pattern would fit you, here they are:

1. Bust measurement at strongest point, 88 cm (34,5 in.)
2. From sternum (height of armpits) to finished hem 40 cm (15 3/4 in.) (Mine was quite short, you might want to add some)
5. Around the body at shoulder level, including the arms, about 100 cm ( 39,5 in.)
6. Width of arm at strongest point (flex your biceps!): 28 cm (11 in.)
7. Length of sleeve from shoulder point to where you want your hem: 53 cm (20 3/4 in.)

You will also need the wrist measurement and the waist measurement later.

And here is how you construct the pieces:
Ok, now you can start sewing. Sew the side seams and the sleeve seams first. If you want elastic for your wrists, you can sew the sleeves all the way and make the hem the same way I made my hem for the bodice. If you want little sleeve cuffs like mine, leave them open at the bottom by about 18 cm (7in.).
Sew the sleeves to the bodice (the raglan seams), including the 10 cm allowance at the top. Now fold the 10 cm (4 in.) allowance at the top (neck) in half (use your iron!) and zigzag it to the wrong side of the blouse:
The pin is my marker for the center
Don't worry if it doesn't look great, you will now pin and sew a band over that stitching line. Leave a little opening and fold under the ends:


Use a cord or make your own self-fabric band like I did and pull it through that channel you just made.

For the hem, I folded under the allowance (about 6 cm, 2,5 in), however long you want your blouse to be. I stitched it to the wrong side just like I did at the neck. Then in three rows, I sewed a wide elastic to the back (over the hemline), using a zigzag stitch again:

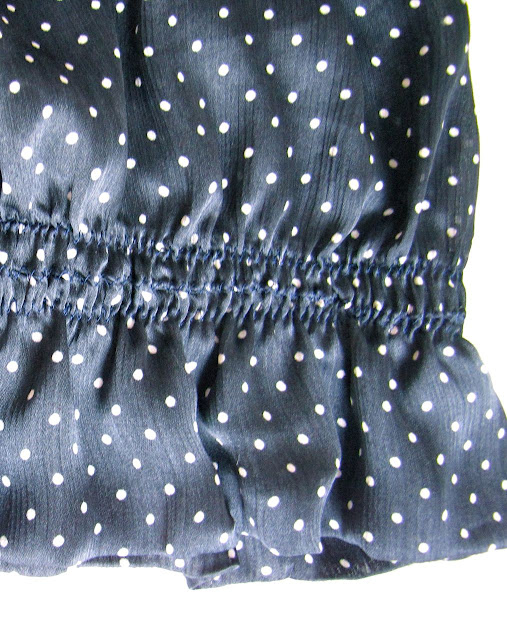
I hate tight elastics in my waist. I suggest you make the elastic fit your waist without stretching it
For the sleeve hems you can do the same thing. Or you leave the bottoms open, use bias tape for that slit or make a very small little rolled hem like me (but do a nicer job than me!):


Fold under the hem, zigzag it to the inside like the other hems, gather the sleeves to the width of your wrist (but don't forget to add a bit of ease for the button...). Now sew a band over the hem stitching line and the gatherings. You can sew in a little loop for a pearl button like mine:
I did not do a very nice job, I was so giddy to get done... The fabric is forgiving, though...
You are done!

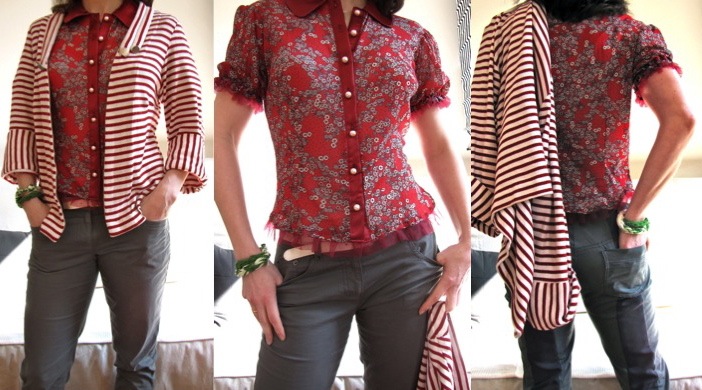
The sleeves are hanging at a weird angle because we used the 45 ° angle (actually 135°), which makes the underside of the sleeve longer than the upper side. For this kind of blouse, this is intentional, because it gives that nice loose, flowy shape to the sleeves. I like it that way. If you don't, you can experiment with different angles. It does not have to be the same angle at the bodice and the sleeve, but the raglan seams have to be the same length, so the pieces match...

Let me know if any of this is too vague for you, please. My English sewing terms are still not really where they need to be to write proper tutorials, but try me - I can learn! :-)

Tuesday, May 10, 2011

My 10 Piece Winter Travel Set: 7 down, 3 to go!

Oh people, I am excited - my ten piece winter set is slowly but surely coming together. I can already combine a few pieces differently and come up with several outfits!
UPDATE: I posted a full tutorial for this blouse HERE.
Here are my pieces number six and seven:

 A dotted blouse and black shorts. The blouse pattern is made by me - I will share a little how-to on this blog hopefully by the end of this week! - and the shorts are actually the Karl Lagerfeld skirt from BWO 10/2010, turned into shorts.
If you want to look at a few more pictures and get some details, click on the little "read more" button right underneath...

Wednesday, May 4, 2011

Me-Made-Mittwoch #7!

This post is a little bit later in the day than usually, because I had to actually sew a little underskirt this morning to be able to present this knitted skirt... This is why I love me-made-Wednesdays. Not only do I have to find new combinations (I try to wear more than one me-made piece), but it makes me actually wear some of the things that have been lying in the closet...

I called the blouse the forgetful-seamstress' blouse in my BurdaStyle studio, (click the link for details) because if I had remembered how difficult whimsy fabrics are to sew, I would have never made this blouse...
I also admit that I would not knit this skirt again, it took FOREVER.
And another confession: I will probably wear those way-less-cool shoes that you see on the floor next to me when I go out for a meeting this afternoon. As much as I love them, I find the ones in the picture too "party"...

A little update: This combination didn't pass the MMM-fashion-police! :-) So maybe finding new combinations should be done with a little more thought... I have to smilingly admit - I felt much better after putting on a regular pair of jeans before leaving the house. But there is this saying: "Wer wagt, gewinnt" (roughly: "you can only win if you try") - maybe next time?

Here is the link to the other Wednesday-outfits! Anyone want to join the fun? Cat-und-Kascha is the one organizing it. Thanks Catherine!

So this is what I actually showed in public... Only a me-made-blouse...

So besser?

Versus this original outfit...


Wednesday, April 20, 2011

Me-Made-Mittwoch #5!

Wednesday (Mittwoch) again! Try my new Tool in the column on the right: The Google-Translator!

Liebe deutschsprachige Besucher - in der rechten Spalte gibt es jetzt den Google-Übersetzer - er wird Euch zwar wohl kaum helfen, das Englisch besser zu verstehen, aber bestimmt zaubert er Euch ein Lächeln auf die Mittwochs-Backen!

Did it help you understand? I bet not. Did it help you smile? I bet!


I recently took stock of all the things I have made so far, and I was surprised how much it is. So I decided to make my Me-Made-Mittwoch outfits as me-made as possible. Here you see three pieces combined - or maybe I should say two and a half...
The blouse I made a long time ago, it's surprising that I can still wear it, as it was my very first go at a real blouse with collar, collarstand and a button closure. It's the Burda pattern 7831, and it was one of my first things posted in my BurdaStyle studio.
The jacket is from a pattern from 1935, from the same magazine I took the pattern for this white coat I recently finished and blogged about. It was originally meant to go with my linen dress, posted here in the BurdaStyle studio...
The pants are not entirely me-made. They were skinny pants and I don't do skinny pants. I mean, they were labeled a 34 I believe (which is usually a size too small for me anyway), but man, they were beyond skinny. So as you see, I was very bold, removed the back pockets, cut both legs open in one straight line , set in a strip of darker fabric and put the pockets back on. Now I can wear them. I swear I look skinnier in them now than I did before, pressed into them like a sausage....


Find out what the other amazing participants are wearing today HERE. Oh, and you'd be welcome to join in the fun any time. Thanks to cat-und-kascha for organizing this!
Have a lovely Wednesday, everybody!

Tuesday, April 19, 2011

You know what I did last Sunday?

Yes, we are all excited about spring kissing our cheeks. But I am behind schedule with my winter set. Luckily it is a Fall-Winter-Spring set (a travel set with 10 interchangeable pieces of clothing), and this was the last really wintery item on the list. It makes the hopefully short return of the 1-digit-temperatures more bearable:


Oh, don't say it... I know it. Santaclause, right? So what? I like the little bit of Santa-ness of this jacket, and I know I will love it when the next winter comes around. Somehow it's more of a before-Christmas garment.
I once bought a really great coat in the middle of summer, and it made the arrival of  winter so much better! On that note, this jacket has built in make-me-happy-power for next October.
I came up with the pattern myself. It's basically a circle. If you want to see how I did it, read on...


Wednesday, April 6, 2011

Me-Made-Mittwoch #3!

Since weeks I say I'll re-organize my closet TOMORROW, which is why I just throw things in wildly. For the first time now, I actually couldn't find a skirt I was looking for. Which is why I ended up with a combination I wouldn't usually have tried. Somehow it works. Let's call it the refashioned menswear look. Or whatever.
For new English speaking visitors: Mittwoch means Wednesday. Every Wednesday, the participants wear self-made clothes. Here are the other outfits!
And here is Cat-und-Kascha who came up with this great idea.

The top is part of my 10 piece winter travel set, I called it a Shirt-T, because it is a long-sleeve T-Shirt with a refashioned mens shirt (collar and cuffs) blogged about here, and the skirt was originally a pencil skirt so tight at the hem that I couldn't board one of those old fashioned cable cars we still have here in Vienna. I used the small part of a tie as belt, and the wide part - well, you can see that yourself. :-)

Sunday, April 3, 2011

A Paper Doll gets dressed!

So I have dreamed up this 10-piece Winter Travel Set, and my first paper doll can show off an outfit! She is sporting three pieces: The very warm tweed pants, as well as the newly finished Shirt-T (I feel all smart about that name, too) and the Faux Fur Vest (click on any image to enlarge).


If you want to see what they look like on her, click "read more". Also if you want to see what they look like in real life, on me, though I'm definitely not as cute as her (and I forgot to put on the hat).

Wednesday, March 30, 2011

Me-Made-Mittwoch #2!

Here it is again, Me-Made-Mittwoch! Mittwoch is German for Wednesday, and I love this idea. While it really is easier than doing a whole month at a time (as in Me-Made-May, Self-Stitched-September, in case you don't know what I'm talking about...), it does give me a good opportunity to incorporate my own stuff into my daily wardrobe. Eventually, I want this to be the case every single day of the year...
I made this blouse, it's a Burda pattern you can find out more about in my BurdaStyle studio. The blazer is from my 1953 travel set, blogged about HERE, and in my BurdaStyle studio HERE.
There is also the tiniest little me-made-detail on my shoe, which you can only see if I sit down. One of the buttons fell off and where are you going to find that exact one? Well, I put on a tiny crochet flower I once made with the tiniest crochet hook I own...
For styling enthusiasts - I am a real beginner myself... - the colour of your socks make a much bigger difference on your outfit than you might think! :-)

Saturday, March 26, 2011

Vintage Pattern Plaid Blouse


Isn't it funny how some outfits just seem to tell you where to take them? For some reason this one makes me want to spend a whole day in the library.


I know I am a bit late to jump on the wagon for the tie-front blouses... I had meant to make this one for so long, but other projects kept interfering. I used a blouse pattern from 1953 that I had made once already for my travel set (you can read about it here).

Thursday, March 24, 2011

Very Warm Tweed Pants

May I present to you my first piece for the "10 piece winter travel set"?
It's a pair of warm trousers, made of a tweed that I instantly fell in love with. I LOVE tweed. Even though it's basically brown, it's somehow much more than that, if you know what I mean...

Here I combined it with my Jean Top, which I had planned as part of my 10 piece set too, but it got kicked off the list...

The legs are cut really wide, so that I can wear it with very thick, woolen grandmother tights, which is just not possible under jeans, right? And I lined them, so they slide easily even with those heavy duty tights under it... (click the button to read more!)


Wednesday, March 23, 2011

My 10 Piece Winter Travel Set!

About a year ago, I found a 10 piece travel set in a magazine from 1953. I loved it so much - all the pieces, as well as the idea of having 10 home sewn pieces that can be combined with each other - that I have decided to come up with my very own 2011 version.

Here is the one from 1953 (and yes, I did sew every single piece of it!):

Source: Vorbachs Neue Moden, Heft 5, 1953


And here are my 10 pieces: