Nice, right? Actually so much better than a zipper!
Normally, I would have opted for a zipper, for whatever reason. I guess I would have found it too much of a hassle to sew snap buttons and I am more familiar with sewing zippers. However, my decision to look up this technique also had to do with my mission of using up my stash/notions/whatever-clusters (I have TONS of snap buttons, but NEVER the right zipper at hand), as well as kneeling myself deeper into the real reason why I sew vintage - to LEARN stuff...
I find snap buttons have 3 advantages at least:
- I didn't expect it, but it actually looks much nicer than any kind of a zipper ever would. (I guess an invisible zipper could, but that really isn't vintage...)
- you can make your side opening as big as you want - I have a wide ribcage and side zippers sometimes still make it difficult to get in and out of a dress, because they don't open high enough...
- you are more likely to have snap buttons in your notions box than the right zipper (and they cost less)
Here are the pictures in the book:
Please look at them very closely. Basically, it shows you everything you need to know. I'm afraid my photos are not as clear as these pictures...
In the picture above you see the closure from the outside on the left, and from the inside on the right. They say you should work with a normal size seam allowance AT LEAST (1,5 cm/ 5/8 inches), and even better a somewhat wider one. With my fabric, a wider one would have been great, as the fabric frays a lot.
How it's done: Basically just by sewing strips of fabric to the seam allowances, so that the seam allowances can lie on top of each other with the buttons attached to them. Real simple.
You close the side seam up to the marks and cut the seam allowance in at those points (where the opening begins). Iron the seam allowances open up to there:
Add a strips of fabric to the seam allowances of the opening, slightly longer than the opening and at least 3 seam allowances wide (my strip is a bit too narrow, you should make it wider and can still cut off any excess later):
Iron the top/front part exactly in the extension of the side seam:
...and fold/iron it under on the inside:
Sew along the front, 3mm (1/8 inch) from the edge to give it more stability and fix the layers.
This is what the outside looks like:
For the back/underlying side, you also sew the strip of fabric to the side seam and fold it under, but you iron it differently, so it creates the base for your bottom snaps:
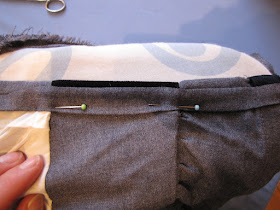
This is what the inside looks like (the pins are only there temporarily to make sure the two layers are placed exactly on top of each other for the next step):
Stitch the ditch:
Secure the slit endings well and sew the overlapping added fabric strips to the seam allowance. For this, please refer to the illustration in the book posted above, as I forgot to take a picture of mine (plus, it does not look as nice...):
Place the slit layers exactly on top of each other and place your buttons.
Just in case you are not aware of this nice feature on snap buttons: They have a hole right through the center. You can use a pin to very precisely place them and keep them exactly where you want them. This also means, once you have sewn your first piece, you can place its counterpart by putting the pin through it, landing exactly on the right place on the other slit opening...
I'm pointing that out because I wasn't aware of this feature until a few months into my sewing "career"... you have three layers of fabric now - sew your buttons to the two inside layers and don't let the stitches show on the outside at all.
Here it is, all finished:
All that was left to do now was hemming the sleeves and skirt. I used slipstitching, taking a tiny amount of fabric from the front (literally like two threads):
...and a bigger amount from the turned-under hem:
Done!
I hope this series was somewhat useful for you out there. I will do this again on my next vintage item I sew and hopefully get better at it (the tutorial part, the photos, and the technical sewing itself). I can't decide which pattern to sew next, so I am having a bit of a "VOTE AND WIN" going on to help me choose, and you can win a pattern! Voting is open until April 1st.
Next up is my refashion project for February. Sneak peak:
Best to all of you!
Katja


I used this technique too on my 1940's dress, I like it and it is far more discrete and secure than I expected. I also placed a hook and thread bar at the waistline seam. However the fabric is viscose, and the top layer at the high hip starts to curl out by the end of the day, just a minor thing though!
ReplyDeleteThat's a great point about snaps being cheap, zips were probably relatively expensive back then!
This is so so brilliant! You just saved me a lot of money because I have zero zippers and tons of snaps! Thank you so much!
ReplyDeleteI recently discovered that I love using snap fasteners too! I will have to use your method next time, as I just sort of "made it up" for my project.
ReplyDelete